
Welcome to ham-interfaces.com
Trusted by Amateur Radio Operators Since 2006
How to Set Up a Yaesu FT-710 for FT8, WSJT-X and Digital Modes

We regularly receive questions about setting up digital modes on different transceivers, and the Yaesu FT-710 is one of the most popular. This guide shows you how to configure the FT-710 for FT8, FT4, JS8Call and other digital modes using our Digimode-4-Yaesu interface, WSJT-X software and a Windows PC.
This guide assumes you are familiar with the basic operation of your FT-710, can install software and drivers on your computer, and have already installed WSJT-X or your preferred digital mode software.To use the FT-710 with our interfaces, you will need the Digimode-4-Yaesu (Option 6).
This interface contains an integrated USB sound card and connects directly to the FT-710's 6-pin Mini-DIN DATA socket. A built-in USB pass-through connection allows CAT control between your computer and the radio using a single, simple setup.

Our Digimode‑4 connects to your PC with a single USB cable and uses a dedicated built-in USB sound card for clean, transformer‑isolated Tx/Rx audio.
Compatible with WSJT‑X, Ham Radio Deluxe, FLDigi, and more—ideal for FT8, JT65, PSK, JS8Call, and other digital modes.
Using its built-in USB pass-through, it connects directly to the USB Type-B port on your FT-710 for CAT control.
You can buy the Digimode-4-Yaesu (Option 6) for your FT-710 from our Yaesu shop.
The Yaesu FT-710 is a modern transceiver that offers considerable flexibility for digital mode operation. While this makes the radio highly capable, the number of configuration options can make the initial setup seem a little daunting. This guide walks through the settings required to get your FT-710 working reliably with digital mode software.
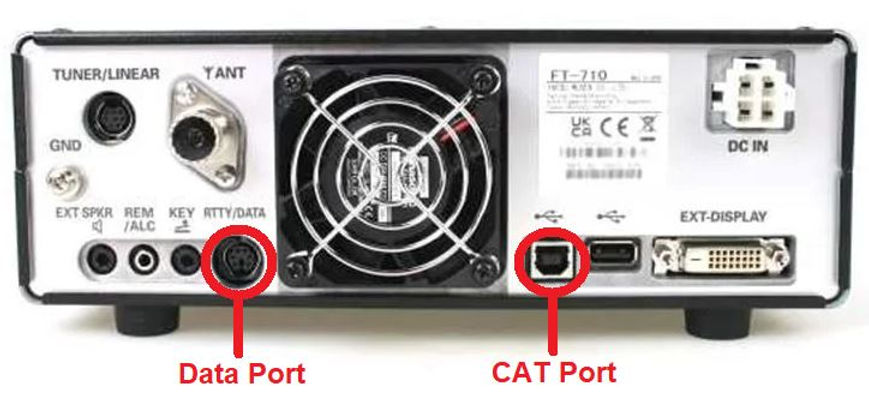
For this guide, the connection between the PC and the FT-710 uses the radio's rear panel USB-B port for CAT control, allowing software such as WSJT-X to control frequency and operating mode automatically.
Transmit and receive audio are handled separately through the FT-710's 6-pin Mini-DIN RTTY/DATA port using our Digimode-4-Yaesu (option 6) interface.

Hardware and Driver Installation
Before we start configuring WSJT-X, we need to identify the audio devices that Windows has assigned to the Digimode-4 interface. Make a note of these device names, as you will need them later when configuring your digital mode software.
Connect only the Digimode-4 interface to your PC using its USB-A cable. There is no need to install any additional drivers, as the interface uses the C-Media CM108B USB audio codec, which is supported natively by Windows, macOS and Linux.
In Windows, click the speaker icon on the taskbar and expand the list of audio playback devices.
Look for an entry called USB Audio Device. Depending on your system, Windows may add a prefix, such as 8-USB Audio Device, as shown below.
Make a note of the full device name exactly as it appears, as you will need to select this device later within WSJT-X.

One area that often causes confusion when setting up the FT-710 is CAT control. Unlike many transceivers, the FT-710 provides three CAT interfaces:
CAT1 (Enhanced COM Port) Available through the rear panel USB-B connector, this is the primary CAT control port and provides full computer control of the radio.
CAT2 (Standard COM Port) Also available through the rear panel USB-B connector, this secondary serial port is typically used by software for PTT control.
CAT3 (CAT/Linear/Tuner Port) This is the traditional hardware CAT interface available through the 8-pin Mini-DIN CAT/Linear/Tuner connector on the rear panel. It is retained for compatibility with older accessories and software.
When used with our Digimode-4-Yaesu interface, we require the Enhanced COM Port (CAT1) for CAT and the Standard COM port (CAT2) for PTT.
For the remainder of this guide, make a note of the CAT1 and CAT2 COM port numbers as we will need them for setting up your Digital Mode Software.
Installing the FT-710 CAT USB Driver
To allow Windows and WSJT-X to communicate with the FT-710 using the Enhanced COM Port (CAT1), you must first install the Yaesu USB COM Port driver.
The latest FT-710 USB COM Port driver can be downloaded here
The driver is supplied as a ZIP archive and includes a Release Notes file containing installation instructions for the supported versions of Windows. Follow the Yaesu installation instructions to install the driver before continuing on below.
Once the driver has been installed, connect the Digimode-4-Yaesu interface to the FT-710 using:
-
The USB-B connection for CAT and PTT control
-
The 6-pin Mini-DIN connection to the FT-710 RTTY/DATA socket for transmit and receive audio
Windows should now detect the FT-710 and create two virtual COM ports required for CAT and PTT operation.
Open Windows Device Manager and expand Ports (COM & LPT). If the driver has been installed correctly, you should see two entries similar to those shown below:
-
Silicon Labs Dual CP210x USB to UART Bridge (Enhanced COM Port)
-
Silicon Labs Dual CP210x USB to UART Bridge (Standard COM Port)
Each device will be assigned a COM port number by Windows.

Make a note of the COM port number assigned to both the Enhanced port and Standard COM Ports. (In our example above, Windows allocated them COM5 and COM6). You will need them for configuring your Digimode Software.
FT-710 Menu Settings
The next step is to configure the FT-710 for digital mode operation. We will be using the CAT1 Enhanced port for CAT control and RTS PTTT, while Transmit and Receive audio signals will be provided through the FT-710 rear-panel 6 pin Mini-DIn DATA connection using a DigiMode-4 interface.
Checking the CAT Baud Rate
The first step is to confirm the CAT baud rate configured for the CAT1 port.
Press the FUNC button on the FT-710 and then select the OPERATION SETTINGS icon on the screen.
As shown in the image below, the default CAT-1 RATE is 38400 bps. Make a note of the value currently configured in your radio. If it is set to 38400 bps, no changes are required. If a different value is selected, record it, as the CAT baud rate configured in your software will need to match this setting.

Audio Input and PTT Settings
Press the FUNC button on the FT-710 and then select the RADIO SETTINGS icon on the screen.
Within the MODE PSK/DATA menu, set MOD SOURCE to REAR. This configures the FT-710 rear-panel 6-pin Mini-DIN DATA connector as the source and destination for the transmit and receive audio signals used by the DigiMode-4 interface.
For the PTT control, set the RPTT SELECT to RTS. This allows the DigiMode-4 to key the transmitter using the RTS signal on the CAT1 Enhanced port.
See the settings in the image below.

Example WSJT-X Radio Settings
Having checked our settings above, here is what the Radio Settings screen would look like in WSJT-X
-
Rig: set to Yaesu FT-710
-
Serial Port: In our example configuration, set to COM5 which was the Enhanced COM port.
-
Baud Rate: Set to the Yaesu Default of 38400. But you need to check in the OPERATION SETTING MENU for yours.
-
PTT Method: The Port needs to be set to the Standard COM port number. In our example it is COM6
-
PTT Method: The PTT method needs to be set to RTS

Example WSJT-X Audio Settings
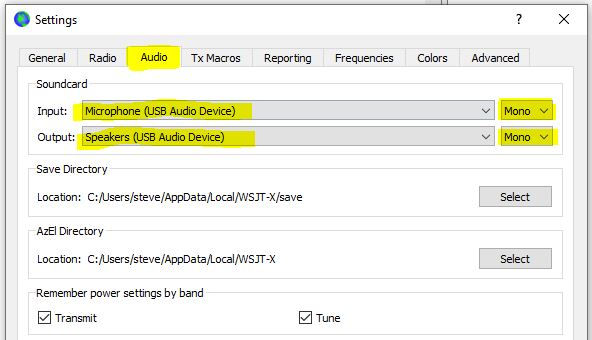
The image below shows a typical WSJT-X audio configuration. Select the DigiMode-4 audio device that was identified at the beginning of this guide and choose it in both the Input and Output device lists.
Finally, set both audio channels to Mono.
Full WSJT-X settings
The settings above will get your FT-710 configured for digital modes such as FT8, FT4, and JS8Call using WSJT-X. They can also be used as a basis for configuring other digital mode applications.
For a complete walkthrough of installing, configuring, and optimising WSJT-X for digital mode operation, see our full guide below: